|
 BACK-PACKING
TRIP TO AUSTRALIA 2011 - Adelaide, South Australia, and ANZAC Day 2011: BACK-PACKING
TRIP TO AUSTRALIA 2011 - Adelaide, South Australia, and ANZAC Day 2011:
Encounter Bay on southern coast of Fleurieu Peninsula:
after our long drive yesterday south from Clare Valley to Adelaide, it was a more leisurely
start today, with hot-cross buns for breakfast brought from the bakers at Kapunda. First thing this morning, there had been a heavy shower and the weather
was still overcast. We therefore decided to switch around the next few days' plans and
today drive down to Encounter Bay and Victor Harbor.
|
Map of South Australia |
 |
 We
set off around 10-30am, paying careful attention to the route via Adelaide's
South Terrace and Anzac Highway out to the main road south, the route we should
have to drive in the hired camper next week en route for Cape Jervis and
Kangaroo Island.
Traffic was reasonably light this morning as we passed through the Adelaide
suburbs. Lucy pointed out features of the route for us to note, such as the last
large supermarket where we could stock up with provisions on the way down to
Kangaroo Island next week. We
set off around 10-30am, paying careful attention to the route via Adelaide's
South Terrace and Anzac Highway out to the main road south, the route we should
have to drive in the hired camper next week en route for Cape Jervis and
Kangaroo Island.
Traffic was reasonably light this morning as we passed through the Adelaide
suburbs. Lucy pointed out features of the route for us to note, such as the last
large supermarket where we could stock up with provisions on the way down to
Kangaroo Island next week.
At Noarlunga we turned off over the hills, and dropped down into the
wine-producing area of McClaren Vale,
passing a number of wineries and vineyards. Traffic was heavier now, being a public
holiday with Adelaide folk heading down to the south coast at nerve-wracking speed on the
narrow roads of the Fleurieu peninsula. Before Victor Harbor, we turned off
around to Encounter Bay, so named after the chance meeting here in 1802 of the
British explorer Matthew Flinders on the
first explorer Matthew Flinders on the
first
 circumnavigation of the continent in HMS Investigator, and the
French explorer Nicolas Baudin who had been commissioned by Napoleon to map the
coastline of Australia. Although their countries were at war with one another,
the two explorers were on scientific expeditions and shared experiences at their
meeting here. Encounter Bay would once have been
a gloriously wild coastline
with southerly gales from Antarctica driving breakers onto the shore; it is now
however a ghastly holiday resort lined with elaborate and over-sized second
homes. These expanding ranks of holiday homes, exuding materialistic ostentation
of the worst kind, were perched on the steep hillside overlooking this beautiful
bay. Encounter Bay, enclosed at its SW end by the bulky bluff of Rosetta Head.
had once been a gathering ground for Southern Right Whales, but these had been
hunted almost to extinction until protected in the late 20th century. Numbers
were now recovering and these baleen whales were now occasionally to be seen once more
in Encounter Bay. circumnavigation of the continent in HMS Investigator, and the
French explorer Nicolas Baudin who had been commissioned by Napoleon to map the
coastline of Australia. Although their countries were at war with one another,
the two explorers were on scientific expeditions and shared experiences at their
meeting here. Encounter Bay would once have been
a gloriously wild coastline
with southerly gales from Antarctica driving breakers onto the shore; it is now
however a ghastly holiday resort lined with elaborate and over-sized second
homes. These expanding ranks of holiday homes, exuding materialistic ostentation
of the worst kind, were perched on the steep hillside overlooking this beautiful
bay. Encounter Bay, enclosed at its SW end by the bulky bluff of Rosetta Head.
had once been a gathering ground for Southern Right Whales, but these had been
hunted almost to extinction until protected in the late 20th century. Numbers
were now recovering and these baleen whales were now occasionally to be seen once more
in Encounter Bay.
Victor Harbor:
after a fish and chip lunch (the fish was a type of Butterfish but more
benign than the similarly named smoked fish of the Baltic coast!), we drove up to the Rosetta
Head viewpoint, and down into Victor Harbor. The curious misspelling of Harbor
occurs in several other place names in South Australia including Outer Harbor at
Port Adelaide, although Victor Harbour railway station is spelt with a
u. The image of a quaint little
port-village conjured up by the name was quickly dispelled: in contrast with the
relatively sedate and gentile atmosphere of the little seaside places we had
seen on the NSW Pacific coast near to Bondi and even Manly, atmosphere of the little seaside places we had
seen on the NSW Pacific coast near to Bondi and even Manly,  Victor Harbor was
truly an over-commercialised resort. Victor Harbor was
truly an over-commercialised resort.
Granite Island: we parked by the little station of the iconic
Victor Harbor horse-drawn trams which had once linked the Murray River
port-town of Goolwa to Victor Harbor and to Granite Island just off the coast,
ferrying cargoes across the causeway to and from sailing ships anchored in the
bay. In contrast, the trams now conveyed hordes of holiday-makers back and
forth. We walked across the 600m long causeway to Granite Island, to make
enquiries at the café about the Little Penguin spotting tours after dusk.
Holiday-makers were expelled from the island after 6-30pm when only those
prepared to pay the expensive fee for the conducted penguin tours were allowed
to remain.
Kaiki Trail coastal path around Granite Island: it was by now almost
4-00pm, and we set off to make use of the time until dusk by walking the Kaiki
Trail coastal path around the 1.5kms of the island's shoreline and cliffs (Kaiki
Trail, Granite Island) with its views out over the Southern Ocean (see
above left and right) and Pacific Gulls soaring overhead or perching on rocks
(see above left); it was so reminiscent
of Skomer Island off the Pembrokeshire coast. A brisk southern breeze drove a crashing
swell onto the granite rocky shoreline (Photo 1: Southern Ocean swell)
(see above right),
and we spent time photographing the breaking waves and the island's clifftop
flora (see right). Fortunately the need to walk more than a few paces deterred the bulk of
the holiday-makers, and the path was reasonably peaceful. The natural
surroundings, largely undisturbed by human pollution, were magnificent with
waves crashing onto the rocks. All of this was enhanced by the wonderful golden light of the
late afternoon sun (see above left), and as we rounded the island's SW corner, the
distant causeway connecting to Victor Harbor again came into view (Photo 2: Distant causeway).
Nearby huge granite boulders were eroded into hollowed-out shapes (Photo
3: Eroded granite boulder).
As the
deterred the bulk of
the holiday-makers, and the path was reasonably peaceful. The natural
surroundings, largely undisturbed by human pollution, were magnificent with
waves crashing onto the rocks. All of this was enhanced by the wonderful golden light of the
late afternoon sun (see above left), and as we rounded the island's SW corner, the
distant causeway connecting to Victor Harbor again came into view (Photo 2: Distant causeway).
Nearby huge granite boulders were eroded into hollowed-out shapes (Photo
3: Eroded granite boulder).
As the 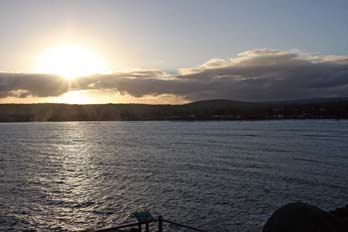 sun was dipping towards a cloud-strewn horizon, we waited to photograph the sun's dying rays and its
flaring tail reflected across the bay (Photo
4: Setting sun). As we stood there, 2 pelicans unexpectedly flew overhead
(Photo 5: Pelicans flying over).
With the light now fading fast, we completed the
circuit of Granite Island's coastal path, and returned to the foreshore by the
causeway; here several seals were cavorting in the shallows of the bay,
seemingly indifferent to human presence. Back at the café, we sat for a cup of
tea, having earlier bought tickets for the penguin tour at 6-30pm. sun was dipping towards a cloud-strewn horizon, we waited to photograph the sun's dying rays and its
flaring tail reflected across the bay (Photo
4: Setting sun). As we stood there, 2 pelicans unexpectedly flew overhead
(Photo 5: Pelicans flying over).
With the light now fading fast, we completed the
circuit of Granite Island's coastal path, and returned to the foreshore by the
causeway; here several seals were cavorting in the shallows of the bay,
seemingly indifferent to human presence. Back at the café, we sat for a cup of
tea, having earlier bought tickets for the penguin tour at 6-30pm.
The Little (or Fairy) Penguins of Granite Island:
as darkness fell, so did the temperature. A squally shower seen earlier heading
along the coast threatened to make the penguin tour a wet experience, but
fortunately the squall passed by. By 6‑30 the sky had cleared, and the Southern
Cross was again distinctly prominent in the night sky. Quite a crowd of visitors
gathered, and was divided into smaller groups around 6 guides for the penguin
tour. Granite Island is home to a colony of Little (or Fairy) Penguins, unique
to the Southern and Eastern Australian coastline. They spend the day swimming
out at sea feeding on fish, and return to shore at dusk, roosting in burrows
and rock crevices. Little Penguins are just 15~18 inches high and live to around
7 years, breeding in monogamous pairs after 2 years and producing 2 eggs each
year. The
Granite Island penguin conservationists conduct an annual penguin census, and
whereas 10 years ago numbers were around 15,000, this has reduced now to just
140 birds nesting on the island's shoreline. The cause of this significant
decline is not known, but the birds have many natural predators including gulls
and seals. Little (or Fairy) Penguins, unique
to the Southern and Eastern Australian coastline. They spend the day swimming
out at sea feeding on fish, and return to shore at dusk, roosting in burrows
and rock crevices. Little Penguins are just 15~18 inches high and live to around
7 years, breeding in monogamous pairs after 2 years and producing 2 eggs each
year. The
Granite Island penguin conservationists conduct an annual penguin census, and
whereas 10 years ago numbers were around 15,000, this has reduced now to just
140 birds nesting on the island's shoreline. The cause of this significant
decline is not known, but the birds have many natural predators including gulls
and seals.
 Penguin emerging from sea at Granite Island") The
guide gave us background information, and with the aid of her amber torch, we
set off around the rocks and breakwater, searching for the tiny penguins as they
came ashore. We saw a number of them, standing on the rocks amid the vegetation
or squatting in their burrows, not at all timid and seeming to pose curiously at
the human presence. We walked around the foreshore, seeing both penguins and
brush-tailed possums, a small cat-sized marsupial, some with joeys in their
pouch. At one point, the guide stood under a light and produced a Little Penguin
carcass from her bag for us to examine. The oily feathers were particularly
soft, almost like fur, and the tiny beak was efficiently designed to swallow a
fish up to two thirds the penguin's own 14 inch body length. We worked our way along
the foreshore and had one particularly good sighting of a penguin as it emerged
from the sea (Photo
6: Little (Fairy) Penguin), stood as if posing on an open rock (see
left). Nearby we had
clear views of 2 possums standing upright like meerkats. The
guide gave us background information, and with the aid of her amber torch, we
set off around the rocks and breakwater, searching for the tiny penguins as they
came ashore. We saw a number of them, standing on the rocks amid the vegetation
or squatting in their burrows, not at all timid and seeming to pose curiously at
the human presence. We walked around the foreshore, seeing both penguins and
brush-tailed possums, a small cat-sized marsupial, some with joeys in their
pouch. At one point, the guide stood under a light and produced a Little Penguin
carcass from her bag for us to examine. The oily feathers were particularly
soft, almost like fur, and the tiny beak was efficiently designed to swallow a
fish up to two thirds the penguin's own 14 inch body length. We worked our way along
the foreshore and had one particularly good sighting of a penguin as it emerged
from the sea (Photo
6: Little (Fairy) Penguin), stood as if posing on an open rock (see
left). Nearby we had
clear views of 2 possums standing upright like meerkats.
The tour ended at around 8-00pm and we walked
back across the causeway towards the now peaceful town of Victor Harbor, the
clear night sky full of stars. had the
additional weary job of the . Traffic
was light for the 1½ hour drive back to Adelaide, and we were back at the apartment by 9-30pm. After our fish and chip lunch, we had a light supper
tonight and planned tomorrow's day in the Adelaide Hills.
 Wine tasting at Protero Wines in the Adelaide Hills: we left mid-morning and drove through the
NE Adelaide suburb of Northwood,
with its shops and café-lined
Parade, up into the Adelaide Hills following the
route of Lucy's epic 140 kms long sponsored cycle ride earlier in the year. The
road gained height, winding up Wine tasting at Protero Wines in the Adelaide Hills: we left mid-morning and drove through the
NE Adelaide suburb of Northwood,
with its shops and café-lined
Parade, up into the Adelaide Hills following the
route of Lucy's epic 140 kms long sponsored cycle ride earlier in the year. The
road gained height, winding up
 through the spectacular rocky scenery of the
Torrens River Gorge to the point where the dammed river formed a reservoir
supplying
water for Adelaide city. through the spectacular rocky scenery of the
Torrens River Gorge to the point where the dammed river formed a reservoir
supplying
water for Adelaide city.
Beyond the summit area of Mount Torrens, the
countryside opened out with impressive views over the hilly terrain grazed by
sheep and cattle. After a spectacularly open hill-climb, we reached Gumeracha,
home to the Toy Factory which makes and sells children's wooden toys and games,
but is more famous for the 18m high, 25 tonnes Big
Rocking Horse (Photo
7: Big Rocking Horse) (see right), a roadside tourist attraction and the local variant of the Australian commercial penchant for Big
objects (Big Pineapples, Big Prawns etc). Beyond here amid the vines and orchards, we
paused for wine tasting at a small producers
Protero Wines, owned by Frank and Rosemary Baldasso, a couple
of Italian origin whose family had emigrated from Treviso in the Veneto. In the
late 1990s they had established a successful small vineyard and orchards on
former grazing land, and their produce under the Protero label was admirably
good. We took a bottle of their 2006 Viognier (a Rhône Valley grape), a dry
white wine with a delicate apricot nose and taste, and their 2008 Pinot Noir
Rosé, full of the grape's fruitiness with a lingering dryness on the palate.
Adelaide Hills town of Lobethal:
we wound our way through the hills to the small
hilltop country town of Lobethal, a support centre for the local agricultural
industry. Here we stopped for lunch in the main street at the Rising Sun (Photo
8: Rising Sun, Lobethal) (see left),
a splendid local pub with the first real public bar we had encountered in SA.
The hospitable landlord served us a delicious thick tomato, bean and chorizo
soup with garlic bread, and equally impressive was the locally brewed
Lobethal Bier-Haus microbrewery beers.
The German immigrant township of Hahndorf in
Adelaide Hills: despite concerns that traffic around the Easter weekend race-meeting and country fair
at Oakbank would cause delays, we
continued on through the hills, pausing at a chocolate factory where the
clientele consisted mainly of already overweight people intent on adding further
to their obesity by stuffing bags full of Easter weekend race-meeting and country fair
at Oakbank would cause delays, we
continued on through the hills, pausing at a chocolate factory where the
clientele consisted mainly of already overweight people intent on adding further
to their obesity by stuffing bags full of
 sweets and chocolates. Beyond Balhannah, we passed close to a settlement curiously named Verdun; originally
named Grunthal by the
German
settlers who established the town, Verdun was renamed in 1917 after one of the
bloodiest battles of the First World War. We moved on to Hahndorf, an attractive
town but today the most tourist-infested place in the Adelaide Hills, inevitably
crowded on Easter weekend. Hahndorf was founded in 1839 by Lutheran emigrants
from Prussia, presumably fleeing Catholic persecution; it is Australia's oldest
German settlement, a status fully exploited today by the local tourist industry.
After WW1, the South Australian Government changed many German-sounding place
names due to anti-German sentiment; Hahndorf's name was changed to Ambleside in
1917, but Hahndorf was re-instated as the town's name in 1935. German influence
was still apparent in Hahndorf in the traditional fachwerk wood-framed
architecture of surviving original buildings. Bavarian-style restaurants and
tourist shops along the main street were thoroughly commercialised and OTT, but
despite this, the town had a residual charm and fascination (Photo
9: Hahndorf). A small memorial
park commemorated the original 1839 settlement: what human suffering, we
wondered, caused persecuted Lutherans to flee half-way around the world, rather
than move to more sympathetic Lutheran states like sweets and chocolates. Beyond Balhannah, we passed close to a settlement curiously named Verdun; originally
named Grunthal by the
German
settlers who established the town, Verdun was renamed in 1917 after one of the
bloodiest battles of the First World War. We moved on to Hahndorf, an attractive
town but today the most tourist-infested place in the Adelaide Hills, inevitably
crowded on Easter weekend. Hahndorf was founded in 1839 by Lutheran emigrants
from Prussia, presumably fleeing Catholic persecution; it is Australia's oldest
German settlement, a status fully exploited today by the local tourist industry.
After WW1, the South Australian Government changed many German-sounding place
names due to anti-German sentiment; Hahndorf's name was changed to Ambleside in
1917, but Hahndorf was re-instated as the town's name in 1935. German influence
was still apparent in Hahndorf in the traditional fachwerk wood-framed
architecture of surviving original buildings. Bavarian-style restaurants and
tourist shops along the main street were thoroughly commercialised and OTT, but
despite this, the town had a residual charm and fascination (Photo
9: Hahndorf). A small memorial
park commemorated the original 1839 settlement: what human suffering, we
wondered, caused persecuted Lutherans to flee half-way around the world, rather
than move to more sympathetic Lutheran states like Saxony or Rhineland? We
walked the length of Hahndorf's main street, knee-deep in tourists of every
nationality, though we did also hear older local people speaking in German; the
genuine traditions Saxony or Rhineland? We
walked the length of Hahndorf's main street, knee-deep in tourists of every
nationality, though we did also hear older local people speaking in German; the
genuine traditions
 and culture of the original settlers still clung on 170 years
later. and culture of the original settlers still clung on 170 years
later.
Victoria Park Adelaide on a sunny Easter
Sunday autumn morning: on a warm Easter Sunday
morning, with the deciduous trees (incongruously for us) now fully in their golden autumn leaf, we went for a walk in the Adelaide sunshine
(see above right and left). Crossing Hutt Street, church bells rang out just as at home in
UK as we passed St John's Church on the way to Victoria Park. We paused to
photograph more of Adelaide's historic colonial era houses with their wrought-iron
fretwork-edged verandas
(see right) (Photo
10: Colonial era houses). Victoria Park was lovely with a shady walk along a gum
tree-lined avenue
(Photo
11: Avenue of shady gum trees), distant views of Mount Lofty, and joggers and families out on a
Sunday morning. Returning along Carrington
Street to the crossing with Hutt Street, we stopped at a restaurant for a very
pleasant iced coffee in the Sunday morning sunshine (see left). Looking around at the
pretentious affluence of some of these Adelaide folk, we wondered where the
have-nots of this otherwise materialistic society existed; there must surely be
the other half somewhere as a counter to all these affectatious poseurs(es).
Cleland Wildlife Park in Adelaide Hills: we set off
after lunch up
the Highway into the Mount Lofty range to visit the
Cleland Wildlife Park.
Initial reaction to the name suggested a rather contrived zoo-like collection,
so we were unsure of what to expect. We paid our entrance fee, bought bags of
kangaroo food, and to our pleasant surprise walked across open natural landscape
(Cleland Wildlife Park)
to where Grey Kangaroos were lying or jumping around, totally oblivious to the
intrusion of humans into their habitat. For a sunny Easter Sunday afternoon,
there were remarkably few folk about, and we were able to take photos without
undue intrusion. The kangaroos were unbelievably tame, and we were amazed at
being able to approach and photograph (Photo
12: Grey Kangaroo)
them as they hopped and jumped
around with
their peculiar tail, hind-leg, front-leg gait (see right) entrance fee, bought bags of
kangaroo food, and to our pleasant surprise walked across open natural landscape
(Cleland Wildlife Park)
to where Grey Kangaroos were lying or jumping around, totally oblivious to the
intrusion of humans into their habitat. For a sunny Easter Sunday afternoon,
there were remarkably few folk about, and we were able to take photos without
undue intrusion. The kangaroos were unbelievably tame, and we were amazed at
being able to approach and photograph (Photo
12: Grey Kangaroo)
them as they hopped and jumped
around with
their peculiar tail, hind-leg, front-leg gait (see right)
 and bounding
movement (Photo
13: Bounding Kangaroo); examined close-up, their tails
were remarkably muscular structures, and their fur felt surprisingly soft. They lay calmly,
amazingly allowing themselves to be stroked and fed
from our hands (see left) (Photo
14: Feeding Kangaroos). There were Grey Kangaroos of all
sizes, and one particularly large male around 5 feet tall with a hugely strong
tail, remarkably tame and tolerant of human presence. The clear, sunny lighting
was perfect for photography, and in the nearby trees, Kookaburras squawked noisily. and bounding
movement (Photo
13: Bounding Kangaroo); examined close-up, their tails
were remarkably muscular structures, and their fur felt surprisingly soft. They lay calmly,
amazingly allowing themselves to be stroked and fed
from our hands (see left) (Photo
14: Feeding Kangaroos). There were Grey Kangaroos of all
sizes, and one particularly large male around 5 feet tall with a hugely strong
tail, remarkably tame and tolerant of human presence. The clear, sunny lighting
was perfect for photography, and in the nearby trees, Kookaburras squawked noisily.
Tasmanian Devils:
there was a fixed programme of feeding times, and
at 2-00pm we walked over to the enclosure where the Tasmanian Devils were to be
fed (Photo
15: Tasmanian Devil) (see below right). The keeper threw them chunks of chicken carcass as he explained their
life-style. These fierce, chunky little piglet-like animals are the largest
surviving carnivorous marsupials, around 2 feet long with a solid-looking,
stocky black-brown body, muscular build and long tail; once native to mainland
Australia, they are now found in the wild only in Tasmania. The only larger
carnivorous marsupial, the Thylacine or Tasmanian Tiger, became extinct in the
1930s. The extinction of
Tasmanian Devils in mainland Australia is usually blamed on
dingoes, which
are not found in Tasmania. Devils were hunted in Tasmania their
life-style. These fierce, chunky little piglet-like animals are the largest
surviving carnivorous marsupials, around 2 feet long with a solid-looking,
stocky black-brown body, muscular build and long tail; once native to mainland
Australia, they are now found in the wild only in Tasmania. The only larger
carnivorous marsupial, the Thylacine or Tasmanian Tiger, became extinct in the
1930s. The extinction of
Tasmanian Devils in mainland Australia is usually blamed on
dingoes, which
are not found in Tasmania. Devils were hunted in Tasmania
 as a threat to
livestock
and for fur, but in 1941 were officially protected. Since the 1990s, disease has
drastically reduced the Devil population and now threatens the survival of the
species, which in 2008 was declared
endangered. Government programmes are currently being undertaken to reduce
the impact of disease, including an initiative to build up a group of healthy
Devils to breed in captivity, isolated from the disease. Despite their rotund
appearance, Tasmanian Devils are capable of surprising speed and endurance, and can
climb trees and swim across rivers. They hunt prey and scavenge for carrion,
which they devour with their sharp teeth and claws. In the wild, they emit a
fearsomely screeching howl from which they derived their name as a threat to
livestock
and for fur, but in 1941 were officially protected. Since the 1990s, disease has
drastically reduced the Devil population and now threatens the survival of the
species, which in 2008 was declared
endangered. Government programmes are currently being undertaken to reduce
the impact of disease, including an initiative to build up a group of healthy
Devils to breed in captivity, isolated from the disease. Despite their rotund
appearance, Tasmanian Devils are capable of surprising speed and endurance, and can
climb trees and swim across rivers. They hunt prey and scavenge for carrion,
which they devour with their sharp teeth and claws. In the wild, they emit a
fearsomely screeching howl from which they derived their name
Goannas and Dingoes: we moved next to an enclosure with a huge,
carnivorous Goanna lizard, sat up on his rock blinking at the humans who stood
to admire
him. Down at the Dingoes' enclosure, we waited for their feeding time at 2-30.
Dingoes are descendants of Asian Plains Wolves, and here in captivity at Cleland
looked well-cared for and comfortably fed compared with their wild equivalents.
The family of four Dingoes (mother, father and two daughters) would in the wild
hunt as a pack with a dominant male or female. The attendant fed them chunks of
kangaroo ribs which they dragged off to devour bones and all . These sandy-red coloured wild dogs looked sleek and well-groomed,
and as they time at 2-30.
Dingoes are descendants of Asian Plains Wolves, and here in captivity at Cleland
looked well-cared for and comfortably fed compared with their wild equivalents.
The family of four Dingoes (mother, father and two daughters) would in the wild
hunt as a pack with a dominant male or female. The attendant fed them chunks of
kangaroo ribs which they dragged off to devour bones and all . These sandy-red coloured wild dogs looked sleek and well-groomed,
and as they
 gnawed at their food, they provided perfect opportunity for photos (Photo
16: Dingo) (see above left). gnawed at their food, they provided perfect opportunity for photos (Photo
16: Dingo) (see above left).
Pelicans and Cuddling the Koala: we walked over to see the Pelicans;
these curious birds, with their
enormous bills, swam elegantly around their pond (Photo
17: Pelicans) (see right), launching themselves and
landing with much splashing. But it was
now time for our close encounter with a Koala; we had seen them for the first
time squatting in the branches in their enclosure; large, chunky marsupials,
they consume vast quantities of Eucalyptus leaves each day. In our turn, we
walked through for a Koala cuddle, to tickle the tolerant animal's soft fur as
it contentedly munched its way through its never-ending supply of Eucalyptus
leaves. We took our turn to be photographed with the Koala (Photo
18: Cuddling a Koala) (see left) as it sat in the fork of a tree branch
tucking into its leaves, completely oblivious to the humans
tickling its soft fur.
Potoroos, Emus, and Yellow-footed Rock Wallabies:
on our way to the next enclosure, we photographed Long-nosed Potoroos, a tiny, rat-shaped marsupial with pointed nose, long tail, grey-brown fur and fetching
blue eyes (see right) (Photo
19: Long-nosed Potoroo). Back
through the Kangaroos,
 we
could see a group of Emus
grazing on the grass (Photo
20: Emu flightless bird) (see left); the Emu is the largest of
Australia's native bird species, endemic to Australia and second only in size to
the Ostrich and the Cassowary of New Guinea. They can run at speeds of up to
48kph, and although flightless the Emu has vestigial wings which it flaps for
stability when running fast. Given
the reputation of these 4~5 feet tall flightless birds for vicious kicking from behind,
we approached rather hesitantly. In fact they seemed tame enough to be fed from
the hand. On the far side in a separate rocky enclosure,
we saw a pair of Yellow-footed Rock Wallabies from the Flinders Ranges; they
were sat at a distance, silhouetted against the sky and difficult to photograph,
but at least we had a clear sighting of these rare marsupials. On our way over
to the aviary, we spotted another pair of shy-looking tiny marsupials, either
Bandicoots, Bettongs or Potoroos, grubbing around in the undergrowth of their
enclosure; but it was impossible to identify them precisely at a distance. we
could see a group of Emus
grazing on the grass (Photo
20: Emu flightless bird) (see left); the Emu is the largest of
Australia's native bird species, endemic to Australia and second only in size to
the Ostrich and the Cassowary of New Guinea. They can run at speeds of up to
48kph, and although flightless the Emu has vestigial wings which it flaps for
stability when running fast. Given
the reputation of these 4~5 feet tall flightless birds for vicious kicking from behind,
we approached rather hesitantly. In fact they seemed tame enough to be fed from
the hand. On the far side in a separate rocky enclosure,
we saw a pair of Yellow-footed Rock Wallabies from the Flinders Ranges; they
were sat at a distance, silhouetted against the sky and difficult to photograph,
but at least we had a clear sighting of these rare marsupials. On our way over
to the aviary, we spotted another pair of shy-looking tiny marsupials, either
Bandicoots, Bettongs or Potoroos, grubbing around in the undergrowth of their
enclosure; but it was impossible to identify them precisely at a distance.
Zebra Finches and Tammar Wallabies:
over in the aviary, we were swarmed by wild Budgerigars, and watched tiny Zebra
Finches (Photo
21: Zebra Finches) pecking around on the ground; these colourful birds
are common throughout the arid areas of central Australia. Other
larger crested birds perched up on the branches. We then passed an enclosure of Tammar Wallabies, the smallest of the wallabies and native to Western
and South
 Australia, particularly Kangaroo Island
(see right) (Photo
22: Tammar Wallaby). These were beautifully lit in the afternoon sunshine for photographs. Australia, particularly Kangaroo Island
(see right) (Photo
22: Tammar Wallaby). These were beautifully lit in the afternoon sunshine for photographs.
Wombats:
we were now in for something of a shock: in a
separate enclosure, we found Wombats (Photo
23: Wombat) (see left), short-legged, sturdily-built and
muscular-bodied marsupials, about 1 m in length with stubby tails, and weighing
between 20 and 35 kg, with wicked-looking claws and a reputation for their
vicious bite. Wombats dig extensive burrow systems with their
rodent-like front teeth and powerful claws. One distinctive adaptation of
wombats is their backward-facing pouch. The advantage of this is
that when digging, the wombat does not gather soil into the pouch over its young.
Native to southern and eastern Australia, Wombats are herbivores with a diet
mostly of grasses, sedges, herbs, bark, and roots. Their incisor teeth resemble
those of rodents, being adapted for gnawing tough vegetation. They have a very
slow metabolic rate, taking around 8 to 14 days to complete digestion, which
aids their survival in arid conditions. A group of wombats is known as a wisdom,
mob, or colony. They certainly looked a fiercesome creature; one was sat quietly
at the rear of the enclosure, but another was grubbing around close to us,
ideally placed for photos. metabolic rate, taking around 8 to 14 days to complete digestion, which
aids their survival in arid conditions. A group of wombats is known as a wisdom,
mob, or colony. They certainly looked a fiercesome creature; one was sat quietly
at the rear of the enclosure, but another was grubbing around close to us,
ideally placed for photos.
Echidnas: across in a further enclosure was another rarity:
Echidnas, with elongated snouts and covered with coarse hair and long spines, (see right)
(Photo
24: Echidna) grubbed around their enclosure.
Echidnas superficially resemble anteaters and
other spiny mammals such as hedgehogs and porcupines, but in fact are unrelated.
They have elongated, slender snouts and a small, toothless mouth and feed mainly
on
 ants and
termites. They feed by tearing open soft
logs and anthills with their claws, using their long, sticky, swiftly-darting
tongue to scoop up prey. When alarmed, they roll up into a prickly ball, or in a
few moments bury themselves in soil, using their spines as a shield, as we later
witnessed on Kangaroo Island. The Echidna's habitat is forests and woodlands,
hiding under vegetation, roots or piles of debris. Along with the Duck-billed Platypus, the Echidna is one of only two
surviving members of the Monotreme order of egg-laying mammals, uniquely
indigenous to Australia and New Guinea and considered a 'living
fossil' which evolved between 20 and 50 million years ago. Unlike
Placental Mammals which are viviparous, the young of Monotremes are hatched from leathery eggs, but nurtured by suckling
from mammary glands in the mother's pouch. The key anatomical ants and
termites. They feed by tearing open soft
logs and anthills with their claws, using their long, sticky, swiftly-darting
tongue to scoop up prey. When alarmed, they roll up into a prickly ball, or in a
few moments bury themselves in soil, using their spines as a shield, as we later
witnessed on Kangaroo Island. The Echidna's habitat is forests and woodlands,
hiding under vegetation, roots or piles of debris. Along with the Duck-billed Platypus, the Echidna is one of only two
surviving members of the Monotreme order of egg-laying mammals, uniquely
indigenous to Australia and New Guinea and considered a 'living
fossil' which evolved between 20 and 50 million years ago. Unlike
Placental Mammals which are viviparous, the young of Monotremes are hatched from leathery eggs, but nurtured by suckling
from mammary glands in the mother's pouch. The key anatomical difference which distinguishes Monotremes from other
Mammals also gives them their name: Monotreme, meaning one-orifice,
refers to the single rear bodily duct (the cloaca) for their urinary,
defecatory, and reproductive systems. Although classed as mammals principally
because of milk-rearing their young, in many important respects such
as egg-laying Monotremes resemble reptiles, the animal group from which the ancestors of
all modern mammals and birds have evolved. The common outlet of cloaca is a feature of birds and reptiles, whereas all
other mammals but Monotremes have two separate external outlets. Monotreme
skeletons also show many primitive characteristics
reminiscent of reptiles: their reptilian gait with legs side-spread and body
low, results from the archaic difference which distinguishes Monotremes from other
Mammals also gives them their name: Monotreme, meaning one-orifice,
refers to the single rear bodily duct (the cloaca) for their urinary,
defecatory, and reproductive systems. Although classed as mammals principally
because of milk-rearing their young, in many important respects such
as egg-laying Monotremes resemble reptiles, the animal group from which the ancestors of
all modern mammals and birds have evolved. The common outlet of cloaca is a feature of birds and reptiles, whereas all
other mammals but Monotremes have two separate external outlets. Monotreme
skeletons also show many primitive characteristics
reminiscent of reptiles: their reptilian gait with legs side-spread and body
low, results from the archaic
 arrangement of shoulder girdle bones. The
Monotreme shoulder girdle has two bones which reptiles also possess but which
other mammals have lost. These primitive
traits, sharing both mammalian and reptilian characteristics, indicate that
Monotremes are derived from earlier mammals than the
Marsupials.
The divergence of Monotreme ancestry from
Marsupial and Placental Mammal lineage happened around 200 million years ago,
prior to the divergence between Marsupials and Placental Mammals around 180
million years ago. The common ancestor of
all 3 classes of Mammals, including the Monotremes, were the Synapsid
proto-mammals, sometimes loosely called mammal-like reptiles. The Synapsids were
all rather lizard-like, egg-laying, with sprawling gait and some with horny
external plates. They diversified over 300 million years ago from the Sauropsids
which gave arrangement of shoulder girdle bones. The
Monotreme shoulder girdle has two bones which reptiles also possess but which
other mammals have lost. These primitive
traits, sharing both mammalian and reptilian characteristics, indicate that
Monotremes are derived from earlier mammals than the
Marsupials.
The divergence of Monotreme ancestry from
Marsupial and Placental Mammal lineage happened around 200 million years ago,
prior to the divergence between Marsupials and Placental Mammals around 180
million years ago. The common ancestor of
all 3 classes of Mammals, including the Monotremes, were the Synapsid
proto-mammals, sometimes loosely called mammal-like reptiles. The Synapsids were
all rather lizard-like, egg-laying, with sprawling gait and some with horny
external plates. They diversified over 300 million years ago from the Sauropsids
which gave rise over evolutionary time to the dinosaurs and later to modern
birds and reptiles. Unlike other modern Mammals, the Monotremes retain many of
the reptile-like features inherited from their Synapsid ancestors. rise over evolutionary time to the dinosaurs and later to modern
birds and reptiles. Unlike other modern Mammals, the Monotremes retain many of
the reptile-like features inherited from their Synapsid ancestors.
Kangaroo with Joey, and a Tawny Frogmouth: after seeing more of the
tiny Potoroos (see above left),
we walked over to another open pasture where more Kangaroos and Wallabies
awaited us. We photographed more of the Kangaroos in the same open pasture, and
to our delight found that one of females was carrying a tiny Joey in her pouch (Photo
25: Kangaroo with joey) (see above right).
This was all too good to be true, and in glorious late afternoon sunlight we spent time photographing the little
chap as he popped his head in and out of his mum's pocket while she grazed  on
the grass. She later stood upright over against a tree giving us a clearer view
of the young joey in her pouch (Photo
26: Mother Kangaroo with joey) (see above left). By the feeding troughs to the rear of the
pastures, larger Kangaroos gathered lit by the late afternoon sun (see right) (Photo
27: Grey Kangaroo). We still had some kangaroo food left, so returned to
the first open paddock to feed and photograph more of the Kangaroos. But after a
long afternoon of being fed by visitors, they were content to lie back to be
stroked (see below right). On our way back, we passed
through a small enclosure where a Tawny Frogmouth squatted silently on a branch
(Photo
28: Tawny Frogmouth) (see left). Despite these large, stocky birds' appearance, large eyes, hooked bill,
and nocturnal habits being similar to owls, they are in fact only on
the grass. She later stood upright over against a tree giving us a clearer view
of the young joey in her pouch (Photo
26: Mother Kangaroo with joey) (see above left). By the feeding troughs to the rear of the
pastures, larger Kangaroos gathered lit by the late afternoon sun (see right) (Photo
27: Grey Kangaroo). We still had some kangaroo food left, so returned to
the first open paddock to feed and photograph more of the Kangaroos. But after a
long afternoon of being fed by visitors, they were content to lie back to be
stroked (see below right). On our way back, we passed
through a small enclosure where a Tawny Frogmouth squatted silently on a branch
(Photo
28: Tawny Frogmouth) (see left). Despite these large, stocky birds' appearance, large eyes, hooked bill,
and nocturnal habits being similar to owls, they are in fact only distantly
related to owls and are more closely akin to Nightjars. They are found throughout Australia, and are protected by superb
camouflage, their silver-grey, streaked plumage blending in with tree branches
on which they roost during the day. distantly
related to owls and are more closely akin to Nightjars. They are found throughout Australia, and are protected by superb
camouflage, their silver-grey, streaked plumage blending in with tree branches
on which they roost during the day.
It was by now gone 4-30pm and
the sun was dipping towards the horizon. This afternoon had been more rewarding
than we could possibly have imagined, enabling us to see and experience at close
quarters so many examples of the unique Australian fauna, far more than we could
have seen in the wild. And the term 'wild life park', with its slightly
derogatory overtones, failed fully to do justice to the open and unconfined
layout and environment of Cleland, kept as it was with a commendable
conservationist and educational
 philosophy. Today had been an unforgettable experience,
and had produced a wealth of excellent photographs. An early night tonight,
foreshadowing a very early start in the morning for the 6-15am Anzac Day dawn
remembrance service at the Adelaide war memorial. philosophy. Today had been an unforgettable experience,
and had produced a wealth of excellent photographs. An early night tonight,
foreshadowing a very early start in the morning for the 6-15am Anzac Day dawn
remembrance service at the Adelaide war memorial.
25 April - ANZAC Day 2011, and dawn Remembrance Service by Adelaide War
Memorial: today was the anniversary of the 1915
landings at Gallipoli by Australian and New Zealand Army Corps troops (ANZACs), a day
traditionally commemorated throughout Australia to honour its war dead in all
conflicts since. The alarm was set for 5-00am and we set off at 5-40 to walk
down to the war memorial on North Terrace. It was still dark with a clear,
starry sky, but with the first glimmers of early dawn just beginning to brighten
the eastern horizon (Photo
29: War Memorial at dawn) (see left). Quite a crowd had gathered around the war memorial for
Adelaide's formal Anzac Day Dawn Service of Commemoration. The service began at
6-15am with the Royal Australian forces forming a catafalque party as the
Vice-Regal salute to greet the arrival of the South Australian Governor. Following the singing
of hymns and prayers of remembrance from the chaplain, wreathes were laid at the
cenotaph, followed by a reading of the Ode They shall grow not old, as we
that are left grow old ... and the
bugler playing the Last Post. The
Two Minutes' Silence was followed by the bugle-call Reveille, and the
service concluded with the National walk
down to the war memorial on North Terrace. It was still dark with a clear,
starry sky, but with the first glimmers of early dawn just beginning to brighten
the eastern horizon (Photo
29: War Memorial at dawn) (see left). Quite a crowd had gathered around the war memorial for
Adelaide's formal Anzac Day Dawn Service of Commemoration. The service began at
6-15am with the Royal Australian forces forming a catafalque party as the
Vice-Regal salute to greet the arrival of the South Australian Governor. Following the singing
of hymns and prayers of remembrance from the chaplain, wreathes were laid at the
cenotaph, followed by a reading of the Ode They shall grow not old, as we
that are left grow old ... and the
bugler playing the Last Post. The
Two Minutes' Silence was followed by the bugle-call Reveille, and the
service concluded with the National
 Anthems of New Zealand and Australia. We
joined in the singing of Advance Australia Fair,
though we were glad of the crib-sheet for the words! The service had begun in
pre-dawn semi-darkness (see right) with the cenotaph lit by floodlights, but gradually
daylight increased as the sun came up in a fully clear sky (see left). As the formal
service finished, we walked over to see the assembly of wreathes around the foot
of the cenotaph (see below right) where serving senior military officers lingered, wearing
seemingly extrovert chestfuls of medals; one might have imagined their uniforms
were hired for the day from theatrical costumiers. Anthems of New Zealand and Australia. We
joined in the singing of Advance Australia Fair,
though we were glad of the crib-sheet for the words! The service had begun in
pre-dawn semi-darkness (see right) with the cenotaph lit by floodlights, but gradually
daylight increased as the sun came up in a fully clear sky (see left). As the formal
service finished, we walked over to see the assembly of wreathes around the foot
of the cenotaph (see below right) where serving senior military officers lingered, wearing
seemingly extrovert chestfuls of medals; one might have imagined their uniforms
were hired for the day from theatrical costumiers.
 The 1915
disastrous Gallipoli Landings and tradition of ANZAC Day:
the 1915 Gallipoli landings had been Churchill's
initiative as First Sea Lord, with the intention of gaining a foothold on the Dardanelles
to open up another front, driving Turkey out of the war and securing a defendable route via
the Black Sea to link up with Russian forces in the Crimea. But the plan totally
underestimated Turkish capabilities, and the ANZAC forces were ill-supplied and
ill-led by senior British officers with the same outdated strategic mentality as
on the Western Front: their only solution to any opposition was to throw more
infantry at it regardless of losses. The landings faced determinedly fierce
opposition by the Turks who, commanded by Mustapha Kemal (Kemal Atatürk), occupied the heights above the landing beaches and poured machine
gun and artillery The 1915
disastrous Gallipoli Landings and tradition of ANZAC Day:
the 1915 Gallipoli landings had been Churchill's
initiative as First Sea Lord, with the intention of gaining a foothold on the Dardanelles
to open up another front, driving Turkey out of the war and securing a defendable route via
the Black Sea to link up with Russian forces in the Crimea. But the plan totally
underestimated Turkish capabilities, and the ANZAC forces were ill-supplied and
ill-led by senior British officers with the same outdated strategic mentality as
on the Western Front: their only solution to any opposition was to throw more
infantry at it regardless of losses. The landings faced determinedly fierce
opposition by the Turks who, commanded by Mustapha Kemal (Kemal Atatürk), occupied the heights above the landing beaches and poured machine
gun and artillery
 fire down onto the helpless ANZACs pinned down below on the
exposed rocky terrain. What had been planned as a bold and decisive pre-emptive
strike to knock the Ottomans out of the war, quickly became a stalemate; the
campaign dragged on for eight months from April~November 1915, with the ANZACs
suffering grievous losses. The invasion was abandoned in December 1915, and the
remaining Allied troops withdrawn. In a cynical attempt to recoup the
tarnished honour of incompetent British commanders, the evacuation was portrayed
to the public as a glorious episode with minimal losses. Despite the enormous loss of life,
the campaign was the first major engagement of ANZAC forces, which bequeathed a
powerful legacy for the Australians and New Zealanders and fire down onto the helpless ANZACs pinned down below on the
exposed rocky terrain. What had been planned as a bold and decisive pre-emptive
strike to knock the Ottomans out of the war, quickly became a stalemate; the
campaign dragged on for eight months from April~November 1915, with the ANZACs
suffering grievous losses. The invasion was abandoned in December 1915, and the
remaining Allied troops withdrawn. In a cynical attempt to recoup the
tarnished honour of incompetent British commanders, the evacuation was portrayed
to the public as a glorious episode with minimal losses. Despite the enormous loss of life,
the campaign was the first major engagement of ANZAC forces, which bequeathed a
powerful legacy for the Australians and New Zealanders and became the symbol of
the new nations' spirit of identity and determination. became the symbol of
the new nations' spirit of identity and determination.
ANZAC Commemoration at the South Australian Light Horse Memorial: last
week, we had seen the granite obelisk Light Horse memorial with the
commemorative horse trough stood alongside, recalling the sturdy Waler outback horses used by the Australian Light Horse cavalry.
The name Waler comes from the horses' 19th century
breeding origins in NSW where they were known originally as New South Walers.
The Corps, celebrated in the film Gallipoli, had been shipped over to Egypt for
training in readiness for the Gallipoli campaign in May 1915. Formerly a light
cavalry regiment, the horses served no purpose on the steep, rocky ground of the
Gallipoli peninsula, and were used purely
 for transporting supplies and
ammunition, or left behind in Egypt. Within 3 months, the 9th Australian Light
Horse, recruited largely from SA men, had been reduced to just 181, mainly by
Turkish attritional gunfire on the exposed rocky slopes of the Gallipoli
shoreline and even more by disease. for transporting supplies and
ammunition, or left behind in Egypt. Within 3 months, the 9th Australian Light
Horse, recruited largely from SA men, had been reduced to just 181, mainly by
Turkish attritional gunfire on the exposed rocky slopes of the Gallipoli
shoreline and even more by disease.
As we arrived at the Light Horse memorial with its honour
guard of troops (see left), a small crowd had
gathered and preparations for the service were underway. The horse trough was
decorated with floral tributes and with apples and carrots honouring the Waler
horses. The service was preceded by the arrival of a troop of 8 Waler horses
ridden by members of the Barossa Light Horse Historical Association, dressed in
WW1 uniforms and equipment (see above left) (Photo
30: Barossa Light Horse). The occasion was organised by Veterans'
organisations from the Light Horse Corps and the successor Royal Australian
Armoured Regiment. The service followed the same format with placing of wreathes
at the foot of the obelisk, and reciting of the Ode, followed by the Last
Post and two minutes' silence. This was followed however with tributes to
the fallen horses, with placing of wreathes and carrots on the commemorative
horse trough (Photo
31: Commemorative horse trough), and words of tribute to the RA Armoured Corps by Veterans. This
had been a more movingly personal service, particularly with the participation
of the troop of horses. Afterwards we walked over to the park to where the
horses and Historical
Association members had gathered after the service (see right), and talked with them
about the Light Horse Regiment. the Barossa Light Horse Historical Association, dressed in
WW1 uniforms and equipment (see above left) (Photo
30: Barossa Light Horse). The occasion was organised by Veterans'
organisations from the Light Horse Corps and the successor Royal Australian
Armoured Regiment. The service followed the same format with placing of wreathes
at the foot of the obelisk, and reciting of the Ode, followed by the Last
Post and two minutes' silence. This was followed however with tributes to
the fallen horses, with placing of wreathes and carrots on the commemorative
horse trough (Photo
31: Commemorative horse trough), and words of tribute to the RA Armoured Corps by Veterans. This
had been a more movingly personal service, particularly with the participation
of the troop of horses. Afterwards we walked over to the park to where the
horses and Historical
Association members had gathered after the service (see right), and talked with them
about the Light Horse Regiment.
2011 ANZAC Day Commemorative March of Veterans:
it was by now gone 9-00am and the main parade of the morning's
celebrations was due to start shortly. We therefore walked back along North
Terrace, where all the groups of veterans were gathering and the bands tuning
up. We took up our position at the corner of King William Street by the Boer War
Equestrian Memorial where the parade would salute right and turn down towards
the river. The parade began at 9-15 with a troop of police horsemen and band (Photo
32: Horsemen leading parade),
and continued for almost 2 hours, with both currently serving troops and
veterans passing by
along North Terrace (see left and right) (Photo
33: 2011 ANZAC Day Parade). There were groups of elderly veterans from
WW2, the Korean War, Vietnam War (Photo
34: Vietnam War Veterans), and more recent peace-keeping operations in
Iraq and Afghanistan. They represented not only the Royal Australian Navy (Photo
35: Royal Australian Navy) and Air Force but regiments and support services from the RA Army
(Photo
36: Royal Australian Army), along with civilian services like police and fire service, interspersed
with marching bands (Photo
37: Australian Army band), particularly Scottish-style pipe and drum bands (Photo
38: Scottish pipe and drum band). Coaches,
minibuses and vintage jeeps carried older veterans no longer able to march (Photo
39: Transport for elderly veterans). As each regimental
group passed by the South African War Equestrian Statue, they saluted with an eyes-right command
(Photo
40: Eyes right salute), some crisply shouted, others in the wearier voice of elderly men. We in
turn joined in the crowds with respectful and grateful applause, acknowledging both
the hardships and sacrifices these elderly veterans had suffered to ensure world
freedom, but also the effort and organisation put into today's marching parade. of police horsemen and band (Photo
32: Horsemen leading parade),
and continued for almost 2 hours, with both currently serving troops and
veterans passing by
along North Terrace (see left and right) (Photo
33: 2011 ANZAC Day Parade). There were groups of elderly veterans from
WW2, the Korean War, Vietnam War (Photo
34: Vietnam War Veterans), and more recent peace-keeping operations in
Iraq and Afghanistan. They represented not only the Royal Australian Navy (Photo
35: Royal Australian Navy) and Air Force but regiments and support services from the RA Army
(Photo
36: Royal Australian Army), along with civilian services like police and fire service, interspersed
with marching bands (Photo
37: Australian Army band), particularly Scottish-style pipe and drum bands (Photo
38: Scottish pipe and drum band). Coaches,
minibuses and vintage jeeps carried older veterans no longer able to march (Photo
39: Transport for elderly veterans). As each regimental
group passed by the South African War Equestrian Statue, they saluted with an eyes-right command
(Photo
40: Eyes right salute), some crisply shouted, others in the wearier voice of elderly men. We in
turn joined in the crowds with respectful and grateful applause, acknowledging both
the hardships and sacrifices these elderly veterans had suffered to ensure world
freedom, but also the effort and organisation put into today's marching parade.
In addition to the main groups of
veterans from Royal Australian regiments
and services (see left), there were smaller groups reflecting the many nationalities of
emigrants to South Australia: Polish
(Photo
41: Polish Veterans) and
Serbian veterans, Greek nationals
(Photo
42: Greek Veterans) accompanied by
marching Evzones, and a group of South Vietnamese veterans who had fled
as refugees after the 1976 communist take-over of their country
(Photo
43: South Vietnamese veterans). We stood in the
now hot morning sun, clapping, waving and taking photos as the groups of
 veterans and bands passed by. Standing close by, two Senior Scouts impressively held the
Australian national flag in the salute position
(Photo
44: Senior Scout with national flag) for two hours in the hot sun as the veterans marched
by. It was thoroughly moving to see people of
all ages, and particularly young people, all showing such respect in remembering
past sufferings and acknowledging the presence of these elderly survivors. veterans and bands passed by. Standing close by, two Senior Scouts impressively held the
Australian national flag in the salute position
(Photo
44: Senior Scout with national flag) for two hours in the hot sun as the veterans marched
by. It was thoroughly moving to see people of
all ages, and particularly young people, all showing such respect in remembering
past sufferings and acknowledging the presence of these elderly survivors.
 Service of Remembrance in presence of Vice-Regal Governor of South Australia: after 2 hours of passing
regimental marching groups and bands, the Light Horse
cavalry troop brought up the rear of the parade
(Photo
45: Light Horse cavalry troop) as the last of the marching groups
turned downhill into King William Street alongside the South African War Equestrian Memorial
and State Parliament Building (Photo
46: South African War Equestrian Memorial). We followed the crowds
downhill and across the River Torrens to a small park for a third and more
formal Service of Remembrance at the Cross of Sacrifice (Photo
47: Remembrance Service). This was surprisingly a
less well attended occasion, and we were able to get positions under shady trees
overlooking the formal gathering of dignitaries, senior military figures and the
chaplain's dais by the cross. This time we were able to see the arrival of His
Excellency the Governor of SA, a former naval officer in his white dress
uniform. A guard of honour stood behind, coming to attention as the service
began with the Governor's arrival
(Photo
48: SA Vice-Regal Governor) (see right). After the usual sequence of wreath-laying, words of
remembrance, Last Post and two minutes' silence, the assembled gathering sang the national
anthems of New Zealand and Australia; more familiar now with the tune and words,
Paul joined in while S captured the occasion on video. Service of Remembrance in presence of Vice-Regal Governor of South Australia: after 2 hours of passing
regimental marching groups and bands, the Light Horse
cavalry troop brought up the rear of the parade
(Photo
45: Light Horse cavalry troop) as the last of the marching groups
turned downhill into King William Street alongside the South African War Equestrian Memorial
and State Parliament Building (Photo
46: South African War Equestrian Memorial). We followed the crowds
downhill and across the River Torrens to a small park for a third and more
formal Service of Remembrance at the Cross of Sacrifice (Photo
47: Remembrance Service). This was surprisingly a
less well attended occasion, and we were able to get positions under shady trees
overlooking the formal gathering of dignitaries, senior military figures and the
chaplain's dais by the cross. This time we were able to see the arrival of His
Excellency the Governor of SA, a former naval officer in his white dress
uniform. A guard of honour stood behind, coming to attention as the service
began with the Governor's arrival
(Photo
48: SA Vice-Regal Governor) (see right). After the usual sequence of wreath-laying, words of
remembrance, Last Post and two minutes' silence, the assembled gathering sang the national
anthems of New Zealand and Australia; more familiar now with the tune and words,
Paul joined in while S captured the occasion on video.
 ANZAC Day pub lunch:
in hot sunshine, we walked back along North Terrace as groups of veterans and those
currently serving in the Australian forces wandered back into town. In King
William Street we caught a tram, intending to get off at City South, but missed
the stop as we talked with one of the veterans on the tram. Walking back from South
Terrace amid ANZAC Day pub lunch:
in hot sunshine, we walked back along North Terrace as groups of veterans and those
currently serving in the Australian forces wandered back into town. In King
William Street we caught a tram, intending to get off at City South, but missed
the stop as we talked with one of the veterans on the tram. Walking back from South
Terrace amid Halifax Street's colonial era houses (see left and
below right), we found a small
pub for an Anzac Day lunch of fish and chips and a welcome pint of beer after
the long morning in the sun. A group of Australian paratrooper veterans were
gathered at the pub for their reunion lunch, adding to the convivial atmosphere.
Later we watched film reports of today's Anzac Day commemorations on the TV evening news, and prepared
for tomorrow's trip to the wine-growing area of Barossa Valley. Halifax Street's colonial era houses (see left and
below right), we found a small
pub for an Anzac Day lunch of fish and chips and a welcome pint of beer after
the long morning in the sun. A group of Australian paratrooper veterans were
gathered at the pub for their reunion lunch, adding to the convivial atmosphere.
Later we watched film reports of today's Anzac Day commemorations on the TV evening news, and prepared
for tomorrow's trip to the wine-growing area of Barossa Valley.
German emigrant towns of Verdun and Lobethal,
and Barossa Valley: after a more relaxed start to the day, we set off around 10-00am
to drive north to the Barossa Valley wine-growing region. Today was the
substitute public holiday for Anzac Day falling on Easter Monday, and there was
a fair amount of holiday traffic as we drove up the Freeway which was carved and
tunnelled through the Adelaide Hills. We turned off through the settlements of
Verdun, Oakwood and Woodside, past Lobethal and through Mount Torrens. This was
an area of rolling, green hills, wooded almost like an English landscape, and
fertile farming countryside served by a series of small, neat-looking towns.
Through Mount Pleasant, the terrain became drier, open pasture-land NE-wards
beyond the rainfall of the Adelaide Hills. Barossa Valley is Australia's largest
premium wine-growing area. Small, stone-built Lutheran churches still stand
along village streets, reflecting the area's 19th century settlement by German
Lutheran emigrants fleeing bigoted Catholic persecution in Prussia during the
1840s. 1000s of German emigrants settled the Barossa, where the soil and
Mediterranean climate made the area ideal for vine-growing. The descendent
family wineries produce some of Australia's most prestigious and expensive
wines. towns.
Through Mount Pleasant, the terrain became drier, open pasture-land NE-wards
beyond the rainfall of the Adelaide Hills. Barossa Valley is Australia's largest
premium wine-growing area. Small, stone-built Lutheran churches still stand
along village streets, reflecting the area's 19th century settlement by German
Lutheran emigrants fleeing bigoted Catholic persecution in Prussia during the
1840s. 1000s of German emigrants settled the Barossa, where the soil and
Mediterranean climate made the area ideal for vine-growing. The descendent
family wineries produce some of Australia's most prestigious and expensive
wines.
 Springton in Adelaide Hills and its German settlers:
we paused at Springton, a farming town whose
most famous 19th century settler had been Friedrich Herbig, a German Lutheran
refugee from Catholic persecution in Prussia. Herbig originally came from
Grünberg in then Prussian-controlled Lower Silesia, now Zielona Góra in the
wine-growing area of SW Poland, which we had visited on our
2010 trip to Poland.
Herbig, originally a tailor, emigrated to SA at age 27 in 1855, and settled at Blumberg 45 km north-east of
Adelaide (known today as Birdwood) which had been founded by German emigrants
seven years earlier. He found work at George Fife Angas' dairy, leased a small
plot of land for growing wheat, and married Caroline Ratty, another German
emigrant. But being so impoverished, the family lived for two years in the
hollowed-out base of a huge, gnarled gum tree at Springton; the remnants of the ancient tree
still survive as a monument in Springton's main street
(Photo
49: Springton hollow gum tree) (see left). From these humble
beginnings, Herbig became a leading citizen of the pioneer town of Springton and
its Lutheran congregation. Springton in Adelaide Hills and its German settlers:
we paused at Springton, a farming town whose
most famous 19th century settler had been Friedrich Herbig, a German Lutheran
refugee from Catholic persecution in Prussia. Herbig originally came from
Grünberg in then Prussian-controlled Lower Silesia, now Zielona Góra in the
wine-growing area of SW Poland, which we had visited on our
2010 trip to Poland.
Herbig, originally a tailor, emigrated to SA at age 27 in 1855, and settled at Blumberg 45 km north-east of
Adelaide (known today as Birdwood) which had been founded by German emigrants
seven years earlier. He found work at George Fife Angas' dairy, leased a small
plot of land for growing wheat, and married Caroline Ratty, another German
emigrant. But being so impoverished, the family lived for two years in the
hollowed-out base of a huge, gnarled gum tree at Springton; the remnants of the ancient tree
still survive as a monument in Springton's main street
(Photo
49: Springton hollow gum tree) (see left). From these humble
beginnings, Herbig became a leading citizen of the pioneer town of Springton and
its Lutheran congregation.
Wine-tasting at Henschke Winery in Barossa Valley:
we continued along the Eden Valley to Keyneton where we stopped at the
Henschke Winery,
descendants of 19th century German emigrants to Barossa and producers of some of
SA's finest red wines; the Henschke family Hill of Grace Shiraz is second only
in prestige and price (retailed at $845 a bottle!) to Penfold's Grange. There
were a number of other visitors in the tasting room, but the hospitable staff
still managed to serve us. We preferred to taste the Riesling and a lighter red; the
heavier Shiraz wines were
first class but not to our taste and their
over-inflated prices
 certainly beyond our pocket! The grounds and estate in
which the 6 generation family winery was set were delightful and secluded. certainly beyond our pocket! The grounds and estate in
which the 6 generation family winery was set were delightful and secluded.
 Penfolds Winery in Barossa:
from here we drove on to the pleasant town of Angaston which was set amid rolling
hill-sides of vines (see left and right).
This week was the biennial Barossa Festival and the town attracted many visitors
on holiday-Tuesday. We paused for lunch at a pizzeria, although small, tasty
baguettes were more than sufficient for us. The old, traditional town had
inevitably received the 'boutique' treatment to attract tourists, and across the
road by the Old Blacksmith's Shop, Bruce the talking cockatoo entertained the
crowds. Just along the street, Angas Park Fruits provided a
different form of attraction, selling all kinds of dried fruits, including dried
bananas and dried nectarines. Before leaving Angaston, we
tried to buy food for tonight's supper at what seemed a farmers' market at the
Yalumba Winery. The number of visitors' cars parked along the roadside indicated
this was a popular event at what was Barossa's oldest established family-run
winery. It was however more of a picnic event, but with no food stalls. We drove
on to Nuriootpa, the Valley's commercial centre, named after an Aboriginal
meeting place. The town is dominated by
Penfolds Winery,
Barossa's largest winery, famous for producing Australia's most prestigious and
expensive wine, Penfold Grange, made predominantly from the Shiraz grape with a
small percentage of Cabernet Sauvignon, and selling at over $500 a bottle. We
stopped for a tasting session; the wines of course were sheer nectar, and we felt
some qualms about accepting their tasting
hospitality but with no intention of paying their alarmingly high prices. Penfolds Winery in Barossa:
from here we drove on to the pleasant town of Angaston which was set amid rolling
hill-sides of vines (see left and right).
This week was the biennial Barossa Festival and the town attracted many visitors
on holiday-Tuesday. We paused for lunch at a pizzeria, although small, tasty
baguettes were more than sufficient for us. The old, traditional town had
inevitably received the 'boutique' treatment to attract tourists, and across the
road by the Old Blacksmith's Shop, Bruce the talking cockatoo entertained the
crowds. Just along the street, Angas Park Fruits provided a
different form of attraction, selling all kinds of dried fruits, including dried
bananas and dried nectarines. Before leaving Angaston, we
tried to buy food for tonight's supper at what seemed a farmers' market at the
Yalumba Winery. The number of visitors' cars parked along the roadside indicated
this was a popular event at what was Barossa's oldest established family-run
winery. It was however more of a picnic event, but with no food stalls. We drove
on to Nuriootpa, the Valley's commercial centre, named after an Aboriginal
meeting place. The town is dominated by
Penfolds Winery,
Barossa's largest winery, famous for producing Australia's most prestigious and
expensive wine, Penfold Grange, made predominantly from the Shiraz grape with a
small percentage of Cabernet Sauvignon, and selling at over $500 a bottle. We
stopped for a tasting session; the wines of course were sheer nectar, and we felt
some qualms about accepting their tasting
hospitality but with no intention of paying their alarmingly high prices.
Maggie Beer's Farm shop:
we now diverted off the main road to visit
Maggie Beer's, a
gourmet farm shop producing patés and all kinds of delicacies, many available
for tasting. Since we should be unable to transport any wines back to UK for our
other daughter and family, we bought
them a present of Maggie Beer's Cabernet Paste, a rich wine jelly to accompany
cheese. We enjoyed tubs of vanilla and elderflower ice cream as an afternoon
treat in the hot South Australian sunshine. accompany
cheese. We enjoyed tubs of vanilla and elderflower ice cream as an afternoon
treat in the hot South Australian sunshine.
 St Hallet Winery in Barossa:
on from here we reached Tanunda, a small town still exhibiting
the German character of its founding settlers. We turned off along Para Road
where three of the town's larger wineries were based, and called in at the
Richmond Grove establishment. Prices again were over-inflated, and we did not
stay for a tasting. Continuing through the town, we turned into the
St Hallet winery,
a medium-sized producer whose promotional material emphasised quality, but with
prices to match! The heavy reds were not to our taste, but we
tried their
whites, particularly enjoying the Riesling and a 2010 Shiraz-Grenache Rosé, a
delicate fruity wine with pleasantly subtle crispness. Despite already having
plenty of bottles, which would have to be drunk before leaving Adelaide and
Kangaroo Island, we took one bottle of the St Hallet Shiraz-Grenache Rosé. St Hallet Winery in Barossa:
on from here we reached Tanunda, a small town still exhibiting
the German character of its founding settlers. We turned off along Para Road
where three of the town's larger wineries were based, and called in at the
Richmond Grove establishment. Prices again were over-inflated, and we did not
stay for a tasting. Continuing through the town, we turned into the
St Hallet winery,
a medium-sized producer whose promotional material emphasised quality, but with
prices to match! The heavy reds were not to our taste, but we
tried their
whites, particularly enjoying the Riesling and a 2010 Shiraz-Grenache Rosé, a
delicate fruity wine with pleasantly subtle crispness. Despite already having
plenty of bottles, which would have to be drunk before leaving Adelaide and
Kangaroo Island, we took one bottle of the St Hallet Shiraz-Grenache Rosé.
Jacob's Creek Winery in Barossa Valley:
we turned back to drive through the peaceful village of Bethany,
the first German settlement in the Barossa, which still retained its orderly
Germanic rural feel: the main street was lined with stone cottages and the
Lutheran church stood at one end of the village. Maintaining the tradition we
had seen so often in Central and Eastern
Europe, most cottages were decorated
with an autumnal figure sat by the front garden. One of the cottage garden
decorations in Bethany took the form of a Tin Man holding a bottle and glass of
wine (see above right).
Just south of Tanunda, we pulled into the
Jacob's Creek Winery Visitor Centre
(see above left).
Founded by German settlers in 1840, Jacob's Creek is now one of the largest of
Australia's wine producers. Their huge, modern Visitor Centre looked out over
fields of vines (see below left), with an even larger aged
gum tree in the beautifully landscaped grounds (see below right). Beside the
Visitor Centre
illustrative sample rows of each of the grape varieties
were planted
(Photo
50: Sample vines). We
 took photos
alongside the vines
(Photo
51 - Jacob's Creek vines) in the golden afternoon sunshine
and, although time was limited with 5-00pm closing
time approaching, we were treated to a noteworthy and hospitable reception for
their very generous tasting session. Perhaps took photos
alongside the vines
(Photo
51 - Jacob's Creek vines) in the golden afternoon sunshine
and, although time was limited with 5-00pm closing
time approaching, we were treated to a noteworthy and hospitable reception for
their very generous tasting session. Perhaps our old-fashioned English courtesy
helped, in contrast with the silly behaviour of Chinese youngsters clearly the
worse for wear from over-indulgence. The young receptionist patiently took us
through a sequence of tastings: three Rieslings, Vermentino, and a first Class
Semillon-Sauvignon-Viognier assemblage. Moving to reds, we tasted a Pinot Noir
and Sangiovese, and were offered a contrasting range of their
heavier Shiraz wines. Clearly their Visitor Centre functioned as a promotional
event, but there was no pressure or even expectation to purchase; our visit and
tasting session at Jacob's Creek was memorably educative, and made a worthy
climax to our Barossa visit today. our old-fashioned English courtesy
helped, in contrast with the silly behaviour of Chinese youngsters clearly the
worse for wear from over-indulgence. The young receptionist patiently took us
through a sequence of tastings: three Rieslings, Vermentino, and a first Class
Semillon-Sauvignon-Viognier assemblage. Moving to reds, we tasted a Pinot Noir
and Sangiovese, and were offered a contrasting range of their
heavier Shiraz wines. Clearly their Visitor Centre functioned as a promotional
event, but there was no pressure or even expectation to purchase; our visit and
tasting session at Jacob's Creek was memorably educative, and made a worthy
climax to our Barossa visit today.
With the ruddy orb of the sun setting in a clear sky after
such a magnificent day's weather, we drove in the gathering dusk across to
Gawler to join the main road for the hour's drive back to Adelaide. Supper
tonight was a delicious Asian assemblage from a take-away in nearby Hutt Street,
which included a crisply fried whole Barramundi fish. Today had been another
memorable day of wine-tasting experiences, enjoying glorious autumn South
Australian sunshine in Barossa
Valley.
 A visit to Coopers' Adelaide Brewery: today we were to visit
Coopers' Adelaide Brewery
which was situated in the suburbs of North Adelaide (see left).
The brewery visit began with a background video on the family company
and its history. Thomas Cooper started his brewing venture in the fledgling colony in 1862,
having emigrated from the West Yorkshire dales near
A visit to Coopers' Adelaide Brewery: today we were to visit
Coopers' Adelaide Brewery
which was situated in the suburbs of North Adelaide (see left).
The brewery visit began with a background video on the family company
and its history. Thomas Cooper started his brewing venture in the fledgling colony in 1862,
having emigrated from the West Yorkshire dales near Skipton. His ailing wife
required a tonic, and Thomas used a family recipe to produce a restorative beer
which was also appreciated by friends and neighbours for more than just its
restorative properties. His beers grew in popularity, which in time led to the
development of a brewery at Leabrook in 1881. After his death, the brewery
passed to his four sons who continued the business, building on the brewery's
reputation for quality. This development continued during the depression and the
two world wars, guided by the second and third generations of Cooper family,
applying themselves to both scientific brewing and commercial promotion of the
business. The fourth and fifth generations continued this development, and by
the 1990s it was clear that the old brewery site's limited capacity could no
longer sustain the pattern of growth. The company therefore moved its brewing
operations to the current newly designed brewery on the Regency Park site in
1998, and has continued to expand the scope and scale of business as a family
concern, which forms the heart of the company's image.. Skipton. His ailing wife
required a tonic, and Thomas used a family recipe to produce a restorative beer
which was also appreciated by friends and neighbours for more than just its
restorative properties. His beers grew in popularity, which in time led to the
development of a brewery at Leabrook in 1881. After his death, the brewery
passed to his four sons who continued the business, building on the brewery's
reputation for quality. This development continued during the depression and the
two world wars, guided by the second and third generations of Cooper family,
applying themselves to both scientific brewing and commercial promotion of the
business. The fourth and fifth generations continued this development, and by
the 1990s it was clear that the old brewery site's limited capacity could no
longer sustain the pattern of growth. The company therefore moved its brewing
operations to the current newly designed brewery on the Regency Park site in
1998, and has continued to expand the scope and scale of business as a family
concern, which forms the heart of the company's image..
The brewing process at Coopers Brewery:
the guide led us, festooned with high-vis jackets, across the
brewery's manicured grounds, past their self-sufficient power generation plant,
to the water treatment plant. All the water used for brewing is drawn from
underground natural aquifers; salts are removed from the highly saline source
water by osmosis, then the desirable Burtonising salts, Calcium
Sulphate (Gypsum) and Magnesium Sulphate (Epsom Salts),
 are added to produce
brewing liquor. In the upper story of the Brewhouse, we were shown the stainless
steel mash tuns where the initial stage of mashing takes place (see above right). Coopers no
longer malt their own barley; the huge quantities of malt required for the
almost continuous brewing are sourced from an Adelaide maltster who in turn buys
the barley from SA farmers. Coopers reckon to conduct around 8 brews over 24
hour periods, 7 days of the week, with a short break Friday~Saturday for
equipment cleaning. The mixes of pale, crystal and are added to produce
brewing liquor. In the upper story of the Brewhouse, we were shown the stainless
steel mash tuns where the initial stage of mashing takes place (see above right). Coopers no
longer malt their own barley; the huge quantities of malt required for the
almost continuous brewing are sourced from an Adelaide maltster who in turn buys
the barley from SA farmers. Coopers reckon to conduct around 8 brews over 24
hour periods, 7 days of the week, with a short break Friday~Saturday for
equipment cleaning. The mixes of pale, crystal and roasted malt, according to
the recipe of the beer being brewed, are milled and added to the liquor in the tuns for
mashing (hydrating the malted barley, to activate the malt enzymes, and convert
the grain starches into fermentable sugars). The resultant wort is then filtered
off and the mash sparged to extract the final fermentable sugar, and the spent
grains sold as stock feed. Pride of Ringwood hops (an Australian hop variety) in
pelletised form are added to the wort for boiling in the stainless steel
coppers, before all the spent hops and gelatinised, flocculated proteinous
debris are filtered off by centrifugation. After the wort has been cooled,
the yeast is added. Coopers have over the years maintained their own pure strain
of yeast, and this is pitched into the hopped wort in the fermentation vessels
for the top-fermentation process to take place. After fermentation, the yeast is
filtered off and the beer piped to the storage area for 3 weeks maturation.
Small quantities of sucrose sugar are added for secondary fermentation to
produce a naturally conditioned beer, whether this is to be packed in can,
bottles or keg-containers. We concluded the tour at the packaging hall, looking
over the automated bottling and canning plants (see left)
(Photo
52 - Coopers' bottling plant). The kegged draught beer is
served at the pub by a top-pressure delivery system, retaining the beer's natural condition. roasted malt, according to
the recipe of the beer being brewed, are milled and added to the liquor in the tuns for
mashing (hydrating the malted barley, to activate the malt enzymes, and convert
the grain starches into fermentable sugars). The resultant wort is then filtered
off and the mash sparged to extract the final fermentable sugar, and the spent
grains sold as stock feed. Pride of Ringwood hops (an Australian hop variety) in
pelletised form are added to the wort for boiling in the stainless steel
coppers, before all the spent hops and gelatinised, flocculated proteinous
debris are filtered off by centrifugation. After the wort has been cooled,
the yeast is added. Coopers have over the years maintained their own pure strain
of yeast, and this is pitched into the hopped wort in the fermentation vessels
for the top-fermentation process to take place. After fermentation, the yeast is
filtered off and the beer piped to the storage area for 3 weeks maturation.
Small quantities of sucrose sugar are added for secondary fermentation to
produce a naturally conditioned beer, whether this is to be packed in can,
bottles or keg-containers. We concluded the tour at the packaging hall, looking
over the automated bottling and canning plants (see left)
(Photo
52 - Coopers' bottling plant). The kegged draught beer is
served at the pub by a top-pressure delivery system, retaining the beer's natural condition.
 Sampling Room, the highlight of any brewery
visit: after seeing the bottling plant, we
returned to the sampling room for the concluding climax of the visit
(Photo
53 - Sampling Coopers' beers)
(see above and below right), and were
taken through a tasting of the complete range of Coopers' beers. We began with
Coopers' Clear, a Sampling Room, the highlight of any brewery
visit: after seeing the bottling plant, we
returned to the sampling room for the concluding climax of the visit
(Photo
53 - Sampling Coopers' beers)
(see above and below right), and were
taken through a tasting of the complete range of Coopers' beers. We began with
Coopers' Clear, a  so-called low carbonate drink but still 4.5% ABV, targeted at
young drinkers, but with almost no taste, a dreadful product as the tour
guide admitted. We then moved on to the range of ales proper. The first,
Coopers' Mild, was in fact a light beer of 3.5% ABV, light in colour, fermented
like the other ales and hopped with Pride of Ringwood and Saaz hops. We then
tasted Coopers' 62 Pilsner, a Bohemian-style pilsner of 5.0% ABV and brewed with
Saaz hops, similar in taste and colour to Pilsner Urquell which we had
seen brewed at Pilsen in Czech Republic. Next Coopers' Lager,
a 4.8% ABV crisp and hoppy lager beer. Coopers' Pale ale at 4.5% ABV, with its
slightly cloudy appearance from its natural condition, had a good balance of
maltiness and hoppy bitterness, brewed in the traditional Burton manner (see
left).
Coopers' Sparkling Ale at 5.8% ABV, full bodied, malty and hoppy, has long been
their flagship beer with its famous red label. Coopers' Dark also at 4.5% ABV
was a creamy dark beer, full flavoured from roasted and chocolate malt, and
wonderful in colour and taste. Coopers' Vintage Ale at 7.5% ABV was a strong
barley wine, resembling the old-fashioned Theakston's Old Peculier beer.
Finally we sampled Coopers' Extra Stout, an excellent
beer which truly resembled the real Dublin Guinness, full-bodied with a robust
dark malt taste. so-called low carbonate drink but still 4.5% ABV, targeted at
young drinkers, but with almost no taste, a dreadful product as the tour
guide admitted. We then moved on to the range of ales proper. The first,
Coopers' Mild, was in fact a light beer of 3.5% ABV, light in colour, fermented
like the other ales and hopped with Pride of Ringwood and Saaz hops. We then
tasted Coopers' 62 Pilsner, a Bohemian-style pilsner of 5.0% ABV and brewed with
Saaz hops, similar in taste and colour to Pilsner Urquell which we had
seen brewed at Pilsen in Czech Republic. Next Coopers' Lager,
a 4.8% ABV crisp and hoppy lager beer. Coopers' Pale ale at 4.5% ABV, with its
slightly cloudy appearance from its natural condition, had a good balance of
maltiness and hoppy bitterness, brewed in the traditional Burton manner (see
left).
Coopers' Sparkling Ale at 5.8% ABV, full bodied, malty and hoppy, has long been
their flagship beer with its famous red label. Coopers' Dark also at 4.5% ABV
was a creamy dark beer, full flavoured from roasted and chocolate malt, and
wonderful in colour and taste. Coopers' Vintage Ale at 7.5% ABV was a strong
barley wine, resembling the old-fashioned Theakston's Old Peculier beer.
Finally we sampled Coopers' Extra Stout, an excellent
beer which truly resembled the real Dublin Guinness, full-bodied with a robust
dark malt taste.
It was interesting to note the difference in
naturally conditioned beers from cans and bottles: even in darkened glass
bottles, beer tended to suffer degradation over time from being exposed to light, whereas
the non-transparent cans protected the beer giving it a superior taste. Being
just after the long Easter weekend holiday, none of the beers were available for
tasting on draught, but the guide told us of local Adelaide pubs where we could
 sample the full range of Coopers' kegged, naturally conditioned beers, including
the Earl of Aberdeen Coopers' Alehouse at the Pulteney Street/Carrington
Street interchange. It had been a thoroughly educative visit concluding with a
unique tasting of Coopers' full range of sample the full range of Coopers' kegged, naturally conditioned beers, including
the Earl of Aberdeen Coopers' Alehouse at the Pulteney Street/Carrington
Street interchange. It had been a thoroughly educative visit concluding with a
unique tasting of Coopers' full range of
 products. Paul could not resist treating himself to a Coopers' cap as a souvenir of our brewing-down-under visit.
Colonel William Light's statue, Light's
Vision: on the return drive, we paused at
Colonel William Light's commemorative statue (the first surveyor-general of
South Australia), positioned on the North Adelaide hillside. This prominent
position overlooked the
Adelaide Oval cricket ground and the city that Colonel Light had, with such admirable foresight,
located on the banks of the Torrens River, with its green open spaces of
parkland. The statue of Colonel Light (Photo
54 - Light's Vision statue) (see right) dating from 1906,
now known as Light's Vision, had originally been located at the northern end
of Victoria Square in the city centre, the principal of the five parkland
spaces among Adelaide's grid-plan of streets, intended as the city's focal point
to provide open space for recreational activities. The statue was however moved in 1938 to Montefiore Hill in North Adelaide,
where it now stands looking down over the city that Colonel Light had laid out in 1836 and had sited against Governor
 Hindmarsh's opposition in the Torrens River Valley. The quotation from Light's journal of 1839, inscribed on the statue's
plinth (see above left) recalling Light's determination, said it all: he entrusted to posterity the
view as to whether his decision on the new colony's capital city location Hindmarsh's opposition in the Torrens River Valley. The quotation from Light's journal of 1839, inscribed on the statue's
plinth (see above left) recalling Light's determination, said it all: he entrusted to posterity the
view as to whether his decision on the new colony's capital city location
 would
be justified: The reasons that led me to fix Adelaide where it is I do not
expect to be generally understood or calmly judged of at present. My enemies,
however, by disputing their validity in every particular, have done me the good
service of fixing the whole of the responsibility upon me. I am perfectly
willing to bear it; and leave to posterity, and not to them, to decide whether I
am entitled to praise or blame. would
be justified: The reasons that led me to fix Adelaide where it is I do not
expect to be generally understood or calmly judged of at present. My enemies,
however, by disputing their validity in every particular, have done me the good
service of fixing the whole of the responsibility upon me. I am perfectly
willing to bear it; and leave to posterity, and not to them, to decide whether I
am entitled to praise or blame.
Carclew House, a historic building in North
Adelaide:
the shopping area of the hillside suburb of North
Adelaide, although busy with traffic, was attractive and we stopped here for a
coffee and to admire the colonial style buildings. One of these was Carclew House, built in 1897 by a wealthy Adelaide family
(see left). The history of the site,
which stands on the traditional land of the Aboriginal Kaurna people of the
Adelaide Plains, dates back to the first European settlement in South Australia
and was originally sold for 12 shillings to George Curtis in the first Adelaide land auctions of 1837. In 1861, James
Chambers acquired the site, which contained a simple two-storey brick dwelling;
Chambers sponsored the exploratory expedition of surveyor John McDouall Stuart,
who was the first European successfully to cross the Australian continent from south to
north and back. Chamber's house was the starting point in October 1861 for the
Stuart expedition, and a plaque on the front garden wall commemorates the event.
The property was subsequently acquired by Sir Hugh Dixson, a businessman and
State MP, who demolished the original building, and in 1897 built the present house. In 1908,
Dixson sold the house to the wealthy Bonython family, who renamed it Carclew
after the estate in Cornwall where their ancestors had lived. It and back. Chamber's house was the starting point in October 1861 for the
Stuart expedition, and a plaque on the front garden wall commemorates the event.
The property was subsequently acquired by Sir Hugh Dixson, a businessman and
State MP, who demolished the original building, and in 1897 built the present house. In 1908,
Dixson sold the house to the wealthy Bonython family, who renamed it Carclew
after the estate in Cornwall where their ancestors had lived. It
 remained the
Bonython family home until 1965, when it was purchased by Adelaide City
Council, and now serves as an educational arts centre. On the way back through
the city, we passed Adelaide Oval Cricket Ground with the memorial statue of Don
Bradman, which we should visit tomorrow, and which Colonel
Light's statue also overlooked from the hillside above (see above right). remained the
Bonython family home until 1965, when it was purchased by Adelaide City
Council, and now serves as an educational arts centre. On the way back through
the city, we passed Adelaide Oval Cricket Ground with the memorial statue of Don
Bradman, which we should visit tomorrow, and which Colonel
Light's statue also overlooked from the hillside above (see above right).
Sir Donald Bradman's statue and Bradman Collection Museum at Adelaide Oval:
today we should visit the Adelaide Oval cricket ground, and
drove down through the city and across the River Torrens to park close to
Adelaide Oval. In the nearby park stood the statue of the renowned Australian
test cricket batsman Sir Donald Bradman who had also played for South Australia (Photo
55 - Sir Don Bradman statue) (see right).
Photographs were taken of the statue in the morning sunshine against the
backdrop of Adelaide Cathedral. We walked round to the ground's entrance and
bought our tickets for the Oval tour, and while waiting visited the Bradman
Museum Collection now housed at Adelaide Oval. Bradman was born in 1908 at
Cootamundra in NSW; he began playing for his state at aged 19 and for the
Australian national team at age 20. It is said that as a boy, Bradman developed
his brilliant hand-eye coordination by bouncing a golf ball against the curved
surface of a water tank in the back yard of his home, and striking it with a
cricket stump. He moved to Adelaide in 1934 to further his business and
cricketing career and played for SA, becoming the greatest test batsman ever. He
just failed to achieve a consistent average innings of 100 by being bowled out
for a duck in his final match in 1948; his batting average remained at the
unprecedented and remarkable score of 99.94 He wrote on
 cricketing matters and
became a national hero, dying in 2001 aged 92. His personal collection of
cricketing memorabilia and scrapbooks cricketing matters and
became a national hero, dying in 2001 aged 92. His personal collection of
cricketing memorabilia and scrapbooks documenting his cricketing career now
forms the basis of the Bradman Collection Museum which we saw this morning. documenting his cricketing career now
forms the basis of the Bradman Collection Museum which we saw this morning.
Adelaide Oval Cricket Ground:
the guide for our visit to the Adelaide Oval was a delightfully
charming elderly gentleman, a retired Adelaide primary school headmaster. He
showed us particular items from the Museum collection, including the ball from
Bradman's first match for NSW, and a cup presented to him by the Royal Worcester
China Works commemorating his matches played at Worcs CCC ground. We were taken up to the press box in the recently completed Sir
Donald Bradman stand overlooking the Oval. During the winter months, the ground
is also used for Australian Rules Football for which the pitch was now marked
out with its curiously shaped goal-posts. The Oval seemed a remarkably small
ground compared with Paul's schoolboy recollections of Northants County Ground. It
was however a delightfully picturesque ground, set against the backdrop of 19th
century Moreton Bay fig trees and Adelaide Cathedral at the northern end with
the Edwardian scoreboard set on the mound created in 1898 from silt carted here
from the widening of the River Torrens in the city.
History of Adelaide Oval: cricket was
first played at Adelaide Oval in 1873 and Australian Football in 1877. The first
Test Match against England was played here in the Ashes series in December 1884,
but it was the notorious Bodyline Test of January 1933 that drew record crowds.
In order to counter Bradman's extraordinary batting skills and prolific scoring
rate, the England captain Douglas Jardine instructed his fast bowlers,
particularly the Nottinghamshire bowler Harold Larwood, to bowl intimidatingly
at the Australian batsmen's body. The tactic, seen as contrary to cricket's
gentlemanly traditions, threatened diplomatic relations between the two
countries Douglas Jardine instructed his fast bowlers,
particularly the Nottinghamshire bowler Harold Larwood, to bowl intimidatingly
at the Australian batsmen's body. The tactic, seen as contrary to cricket's
gentlemanly traditions, threatened diplomatic relations between the two
countries
 for a while. The Adelaide Oval can
now accommodate 34,000 spectators,
but controversial plans are afoot to replace the 21 year old Bradman stand and
enlarge the ground to accommodate 50,000 spectators. From the upper tiers of the
Bradman stand, we stood looking out over the glorious turf trying to show
indifference to the alien Australian Football pitch markings and goal posts
which intruded into the cricket pitch with its line of 8 wickets in the square
at the centre (Photo
56 - Adelaide Oval) (see above left and right). for a while. The Adelaide Oval can
now accommodate 34,000 spectators,
but controversial plans are afoot to replace the 21 year old Bradman stand and
enlarge the ground to accommodate 50,000 spectators. From the upper tiers of the
Bradman stand, we stood looking out over the glorious turf trying to show
indifference to the alien Australian Football pitch markings and goal posts
which intruded into the cricket pitch with its line of 8 wickets in the square
at the centre (Photo
56 - Adelaide Oval) (see above left and right).
Our visit to Adelaide Oval: we were taken across to the more modern
Chappell Stand with its improved shade-cover and seating, to look out over the
ground from there. We were then allowed out onto the hallowed turf which was so
close-cut and springy. This had been re-laid during winter 2006~7 with
irrigation and drainage installed, but the turf of the wicket square was
original, over 100 years old; it seemed sacrilegious to allow hooligans playing
Australian Football to trample on the ground's sacred turf. From here we were
taken over to the Old Scoreboard (see left) (Photo
57 - Old Scoreboard), built in 1911 and this year celebrating its centenary.
We were taken inside to see its internal mechanical workings, and even shown how to adjust the scores (Photo
58 - Old Scoreboard interior).
It took 5 men to operate it on match days, updating all the details of batsmen
and bowlers. Even today it was hot and stuffy in the confined, dark interior; in
the heat of summer, working conditions for the scorers must be almost
intolerable. But nothing was sacrosanct from mercenary greed:
the face
of this magnificent old score
board nothing was sacrosanct from mercenary greed:
the face
of this magnificent old score
board
 was now laid out ready for winter months of
Australian Rules Football! (see above right).
was now laid out ready for winter months of
Australian Rules Football! (see above right).
We then walked around to the West End Hill (Photo
59 - West End Hill), and from the upper tiers of seating
of the recently opened Western Stand, there was a glorious view down onto the wicket
(see left)
(Photo
60 - Western Stand). It was a magnificent panorama across the ground with the city skyscrapers rising beyond
backed by the ring of hills of the Mount Lofty range. We were then taken down
into the trophy rooms below to see the record boards of visitor and Australian
test match centuries scored at Adelaide over the years. This included all the
famous names of international cricket, including those of the West Indian record
batsman Brian Lara, and in the 1970s Geoffrey Boycott. The last entry was Kevin Pietersen's double century in the 2010~11 test match series when England
retained the Ashes. From here we walked through to the tunnel from which players
emerged onto the field; it seemed a short walk from here out to the crease. Then
through to the players' changing rooms where photographs were taken in front of the lockers. The elderly gent who had been our guide had given us an
entertaining and knowledgeable commentary; it had been a real privilege to see
so much of this historic cricket ground.
Coming next:
we had very much missed travelling with George, our VW Camper, during our time in Australia,
but next week we should hire a small camper van
in Adelaide, as our means of travel for our week's camping on Kangaroo Island off the South Australian
coast, in order to see the wildlife, the farming and terrain of this
magnificent island.
Next edition
from Kangaroo Island to be published quite soon
|
Sheila and Paul |
Published: ANZAC Day, 25 April 2021 |
|


